Managing Your Dotfiles with GNU Stow
GNU Stow is a simple but powerful tool for managing your dotfiles across devices.
Instead of manually copying config files or remembering where everything goes, you can store them in a central directory and use symlinks to place them where they belong.
This guide will walk you through setting up GNU Stow for your dotfiles.
1. Create a Dotfiles Folder
In your home directory, create a folder to store all your dotfiles.
- You can name it
dotfilesor.dotfiles. The dot at the start just makes it hidden. Here - I’m going to use
dotfiles. If you use other naming then adjust accordingly.
mkdir ~/dotfilescd ~/dotfiles2. Create a Directory for Each Application
Inside your dotfiles folder, create a directory for each application or tool whose config you want to manage.
These directories are called “stow packages.”
Example
- for .zshrc, .zprofile goes into zsh directory
- for aerospace.toml goes into aerospace directory
- for .tmux.conf goes into tmux directory
cd ~/dotfilesExamples:
mkdir zshmkdir nvimmkdir tmuxImportant: From this point, pretend each package folder is your home directory. The folder structure inside here should match exactly how it appears in your actual home directory.
3. Match the Directory Structure
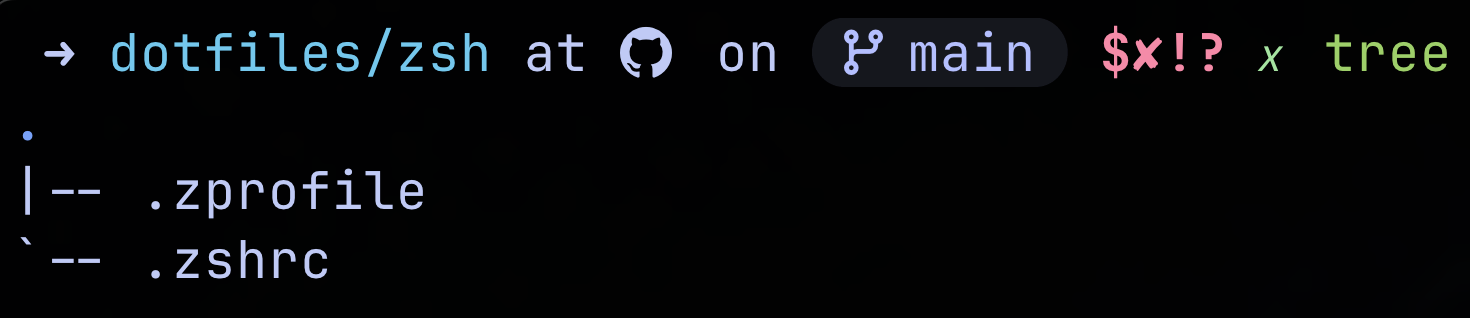
For Single Files in Home Directory
If your software config is a single file in your home directory (e.g., ~/.zshrc or ~/.zprofile etc), place it directly inside your stow package folder.
Structure:
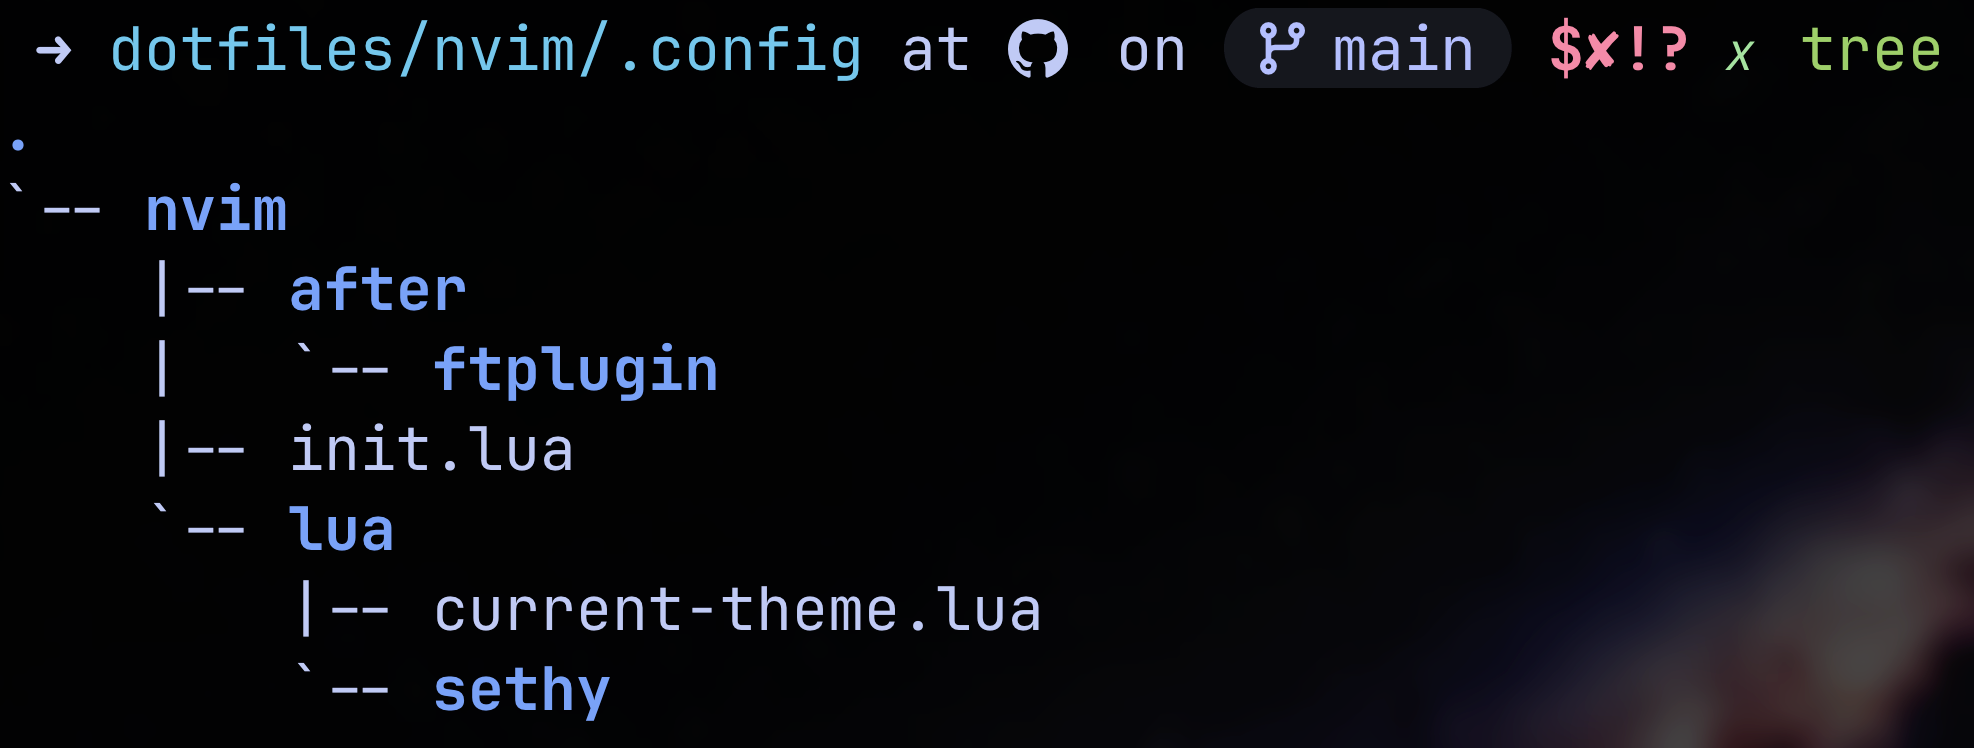
For Configs in Subdirectories
If your software config lives in a subdirectory (e.g., ~/.config/nvim/), you need to recreate the same directory path structure inside your stow package.
Since nvim config lives at ~/.config/nvim/, create this structure:
cd ~/dotfiles/nvim/
mkdir -p .config/nvim
Structure:
Alternatively, you can create the structure step by step:
mkdir .config- Then move your existing nvim directory into .config/
- Don’t move it just yet.
4. Backup Your Existing Configs
Before moving anything, create a backup of your existing configurations:
mkdir ~/.backupCopy your existing configs to the backup folder:
For example zshrc:
cp ~/.zshrc ~/.backup/.zshrc.bakFor nvim:
cp -r ~/.config/nvim ~/.backup/nvim.bak5. Move Configs to Your Dotfiles Folder
Now move your actual configs into your ~/dotfiles structure:
For zshrc:
mv ~/.zshrc ~/dotfiles/zsh/For nvim:
mv ~/.config/nvim ~/dotfiles/nvim/.config/Your files are now ready for stow, and you have backups just in case.
6. Test Stow (Simulation Mode)
You test stow in simulation mode first to see what it will do:
cd ~/dotfilesstow -n -t ~ zshThe -n flag runs a dry run, and -t ~ specifies the target directory (your home directory). If you see output showing it would create symlinks (but no
actual changes), you’re ready to proceed.
-t flag is optional as stow defaults to the parent directory of where you’re running the command from. -t ~ doesn’t hurt and can make the command more explicit about what’s happening, which might be helpful for learning purposes.
7. Apply Stow
The Golden Rule: Always make sure you’re in the root of your dotfiles directory before running stow.
cd ~/dotfilesDry Run stow to check symlinks:
stow -nvt <package-name>Run stow to create the symlinks:
stow <package-name>for example:
stow zsh
For multiple packages at once:
stow zsh nvim tmux aerospace ghostty
This creates symlinks in your home directory pointing to files inside your dotfiles folder.
Unstow
This will unstow and remove the symlinks.
stow -D <package-name>Then manually move the directory/files back to their default location
8. Verify the Symlinks
Check that your symlinks were created correctly:
For zshrc: in home directory run
ls -l ~/.zshrcYou should see:
Relative path
.zshrc -> dotfiles/zsh/.zshrcor Absolute path
.zshrc -> /home/<username>/dotfiles/zsh/.zshrcSame for nvim: in home directory run
ls -l ~/.config/nvimYou should see absolute or relative paths:
nvim -> ../dotfiles/nvim/.config/nvimThe arrow (->) indicates a successful symlink.
Or Just go to your .config or ~ and run ls -al too look for symlinks.
9. Save Your Dotfiles with Git
To keep your dotfiles backed up and synced across devices:
cd ~/dotfiles
git init
git add .
git commit -m "Initial dotfiles commit"
git remote add origin <your-repo-url>
git push -u origin main
10. Managing Ignored Files (.stow-local-ignore)
As your dotfiles repository grows, you’ll want to exclude certain files from being stowed (like README.md, installation scripts, or backup files). Stow provides a way to ignore specific files and directories.
Create an ignore file in your dotfiles root:
cd ~/dotfilestouch .stow-local-ignoreOpen it with your favorite editor and add the files you want to ignore.
# OS files.DS_Store
# Git files.git.gitignore.gitmodules
# Backup files*.bak*.backup*~
Common Stow Commands
- Install a package:
stow package-name - (Unstow) Remove a package:
stow -D package-name - Reinstall a package:
stow -R package-name - Dry run:
stow -nvt package-name - Verbose output:
stow -v package-name - Target different directory:
stow -t /path/to/target package-name
Overall, from my own experience GNU Stow has been really amazing for dotfiles management. Unlike more complex dotfile managers, Stow doesn’ try to reinvent the wheel. It simply creates and manages symbolic links in a predictable, organized way.
This minimalist approach means less can go wrong, and when issues do arise, they’re easy to understand and fix. The real power becomes apparent when you’re working across multiple machines. You can clone your dotfiles repository and run a few stow commands to have everything exactly where it should be. I’ve experimented with other solutions like Chezmoi, which offers more features but comes with additional complexity.
For my workflow, Stow’s straightforward approach wins every time. If you value simplicity, transparency, and reliability in your development tools, GNU Stow is worth adopting. No crazy stuff just simple things done right.